obdtool another blog
obdtool in ukobdtool another blog
obdtool in ukHow to use VAS 5054A ODIS 3.0.3 for Audi A62012 diagnosis
VAS 5054A ODIS 3.0.3 test OK on Audi A62012
This is a test result of VAS 5054A ODIS 3.0.3 diagnosis on 2012 Audi a6 sedan.
diagnostics: VAS 5054A scan tool + ODIS-S v3.0.3
model: Audi A6 (c7) 2012
engine: CDNB 2.01 TFSI / 132 kw
check connection of 5054a scanner and the laptop and the car
run ODIS service
ODIS recognize the car and ignition without any problem
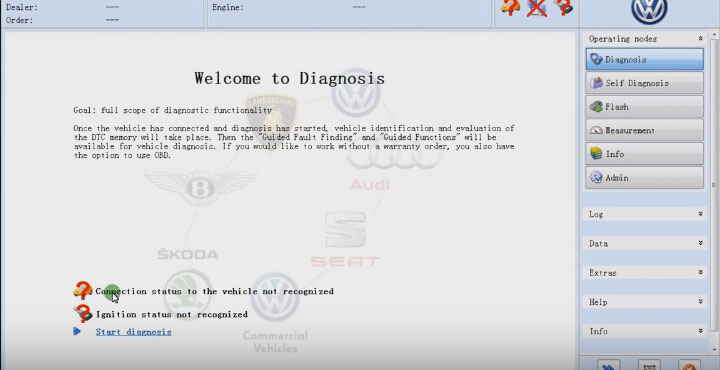
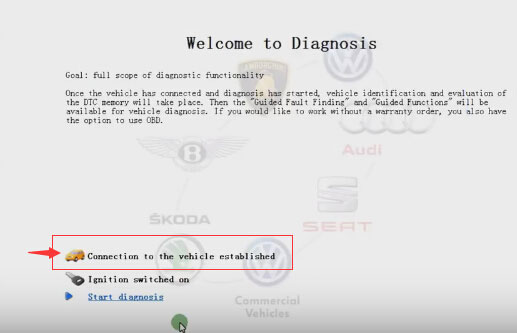
then click on Start diagnosis
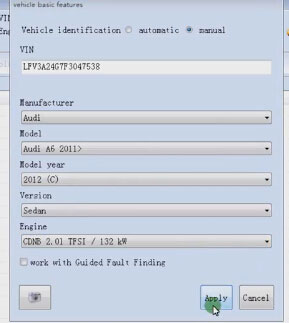
enter vehicle basic information
manufaturer: Audi
model: Audi A6 2011>
model year: 2012 (C)
version: sedan
engine: CDNB 2.01 TFSI / 132 kw
go to Network connection
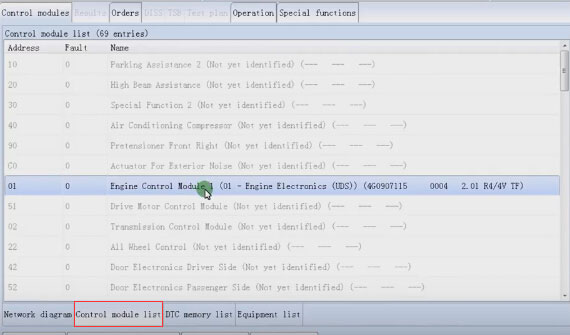
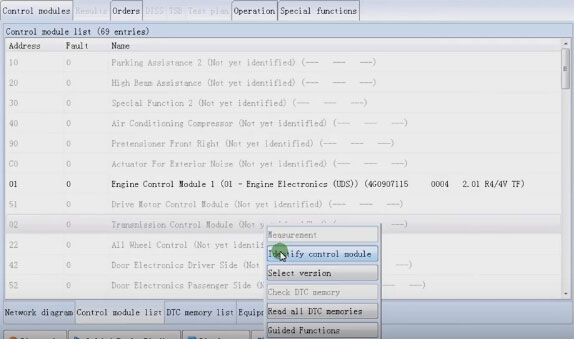
select MOT_01-> Identify control module

engine control module 1
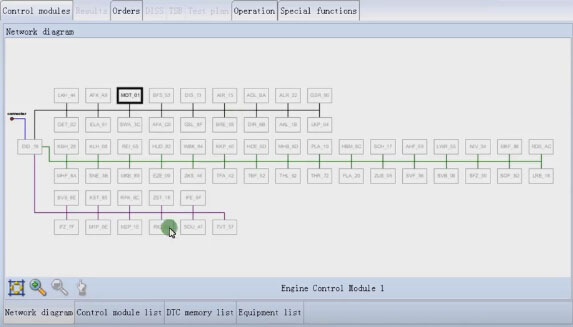
go to Control module list
UDS protocol is supported by VAS 5054A
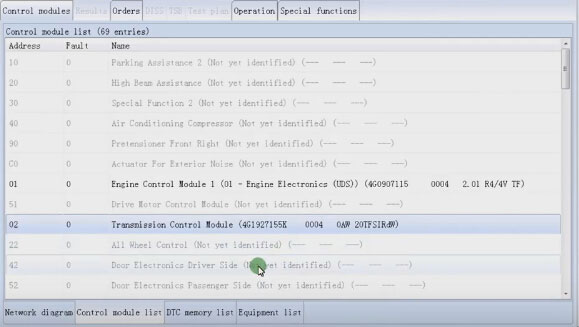
select transmission control module-> Identify control module
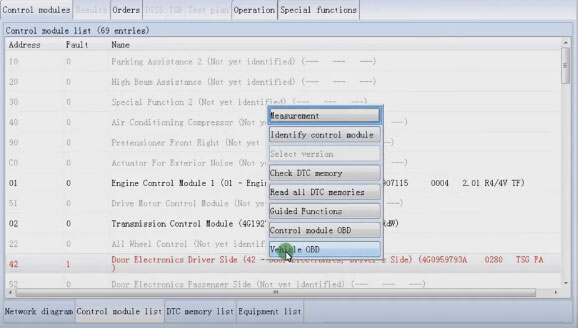
select Door electronic driver side-> Identify control module
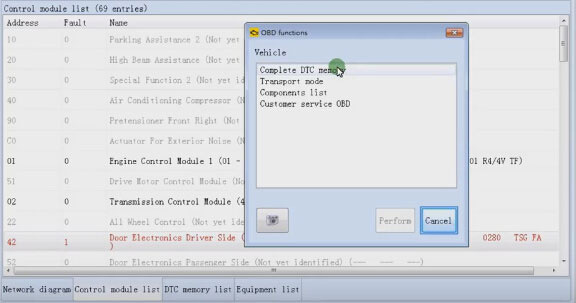
find a faulty code, then select Vehicle OBD to perform OBD functions
select Complete DTC memory
control modules with DTC entries
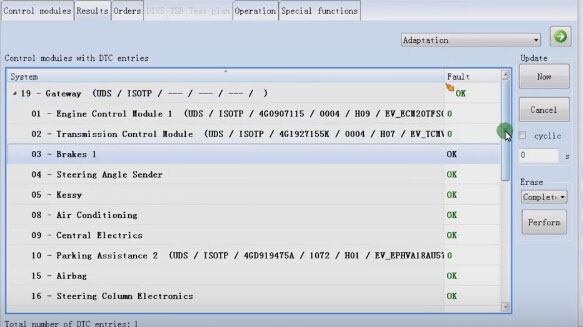


select system 42 line: Door electronic driver side
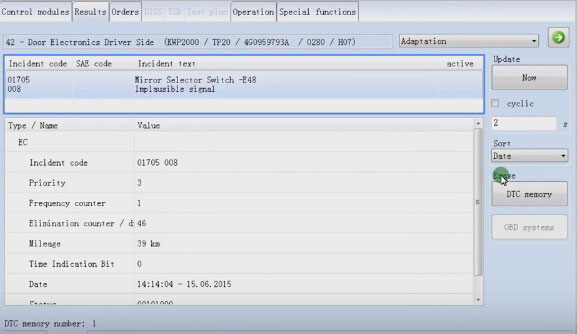
this is the incident code of the door electronic driver side
erase DTC memory
then VAS 5054A diagnosis on AUDI A6 complete.
How to use VXDIAG Cloud Diagnostics? (No need install software)
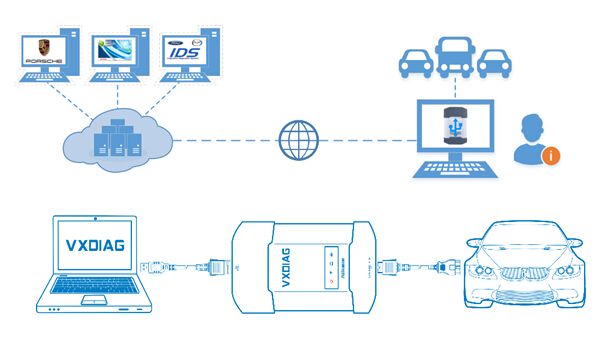
VXDIAG Cloud Diagnostics is now available to use and tested OK by eobdtool engineers! This blog will show you how to use VXDIAG Cloud Diagnostics. Just use your VXDIAG VCX NANO or VXDIAG Multidiagnostic tool. (No need install any software on PC)
Why to use VXDIAG Cloud Diagnostics?
You don’t have to install any OEM software on PC. You can login cloud diagnostic server and diagnose your car directly online after connecting interface to laptop and car. Isn’t it cool?
What you should know about VXDIAG Cloud Diagnostics?
1. VXDIAG Cloud Diagnostics can work on all VXDIAG VCX NANOinterfaces and VXDIAG Multi diagnostic tools.
2. Free download VX Manager 1.2.0.0905: (Needed for VXDIAG Cloud Diagnostics)
3. VXDIAG Cloud Diagnostics laptop requirements: Win 7, Win 8 or Win 10 OS systems (Win XP is not supported); Explorer 11 or Google chrome (For login cloud diagnostic server http://cloud.vxdiag.net)
How to use VXDIAG Cloud Diagnostics?
Part1. Set up VX Manager Driver
Part2. Login VXDIAG cloud diagnostic server and start diagnosis.
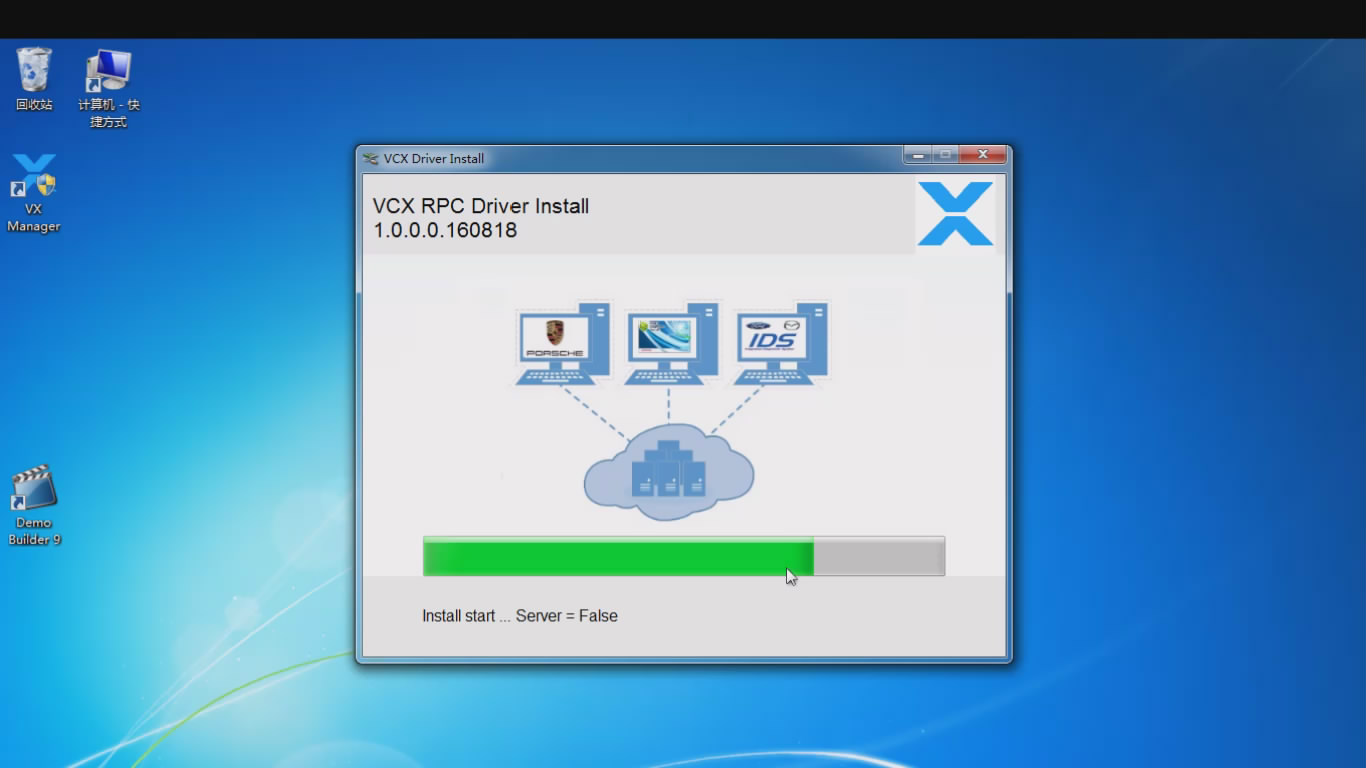
Step1. After installed VX Manager, double click the icon. It will pop up an interface, choose “I accept the agreement”, click “Next”, then “Next”. Wait for a minute it will show “VCX SDK Driver Install”, after that click “Finish”.

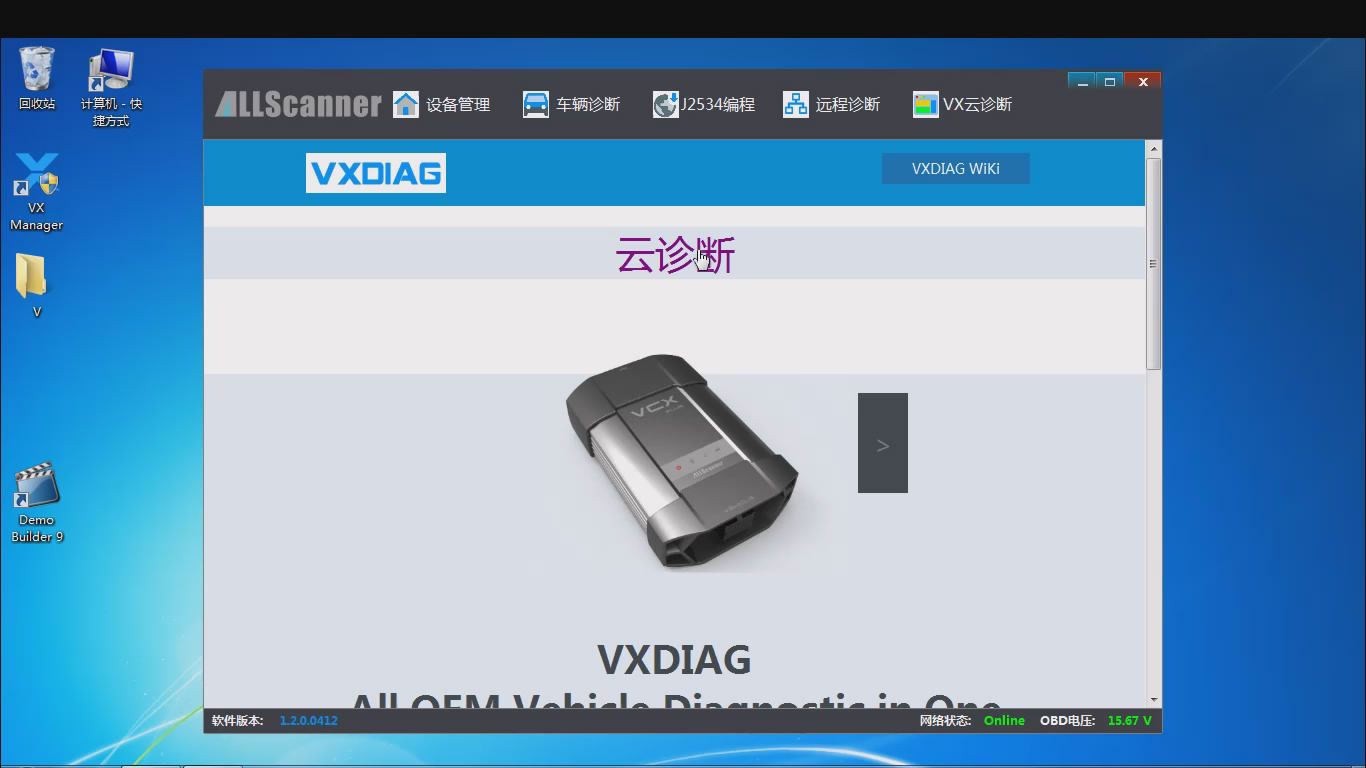
Step2. Double click the “VCX Manager” shortcut, click “Cloud Diagnostics”
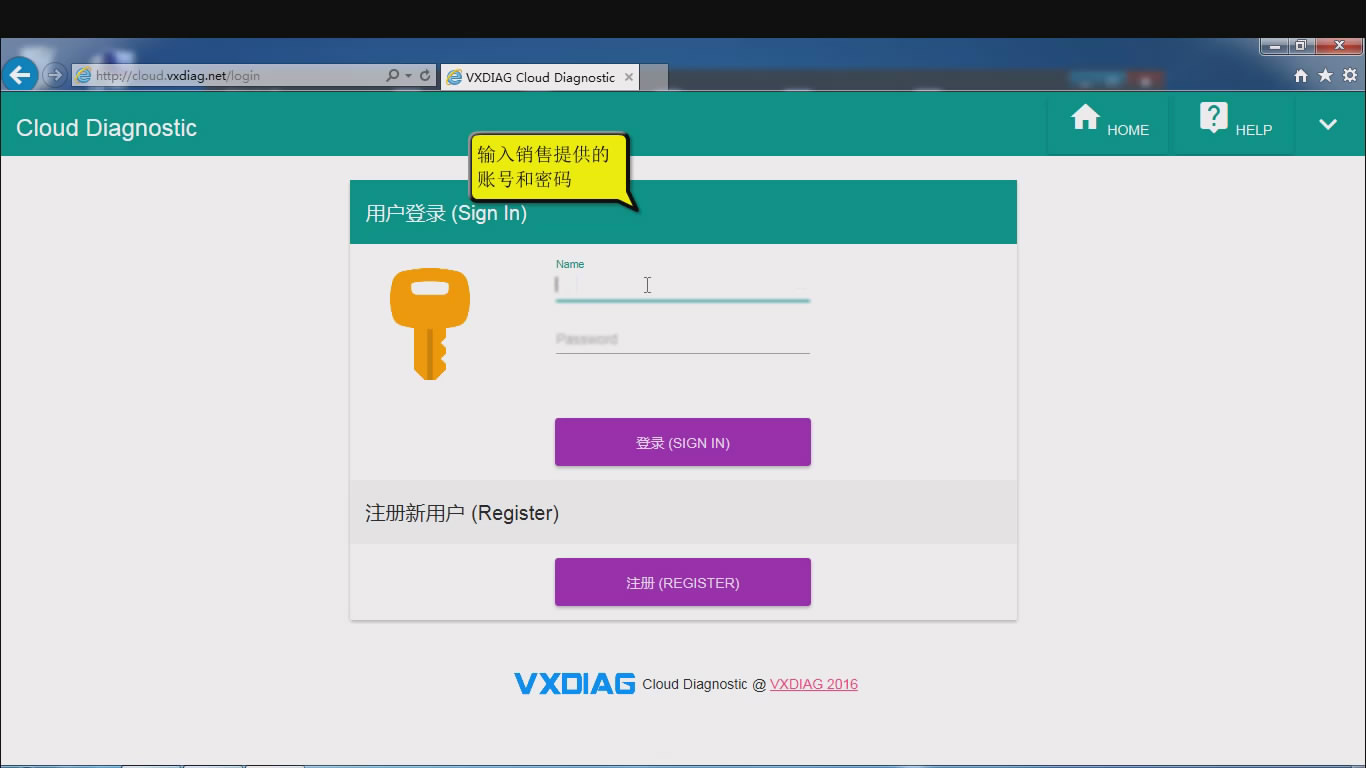
Then it will pop up a website for login. Input name and password (You can ask the sales),
Step3. After login, you can choose whichever car brand to start cloud diagnosis.
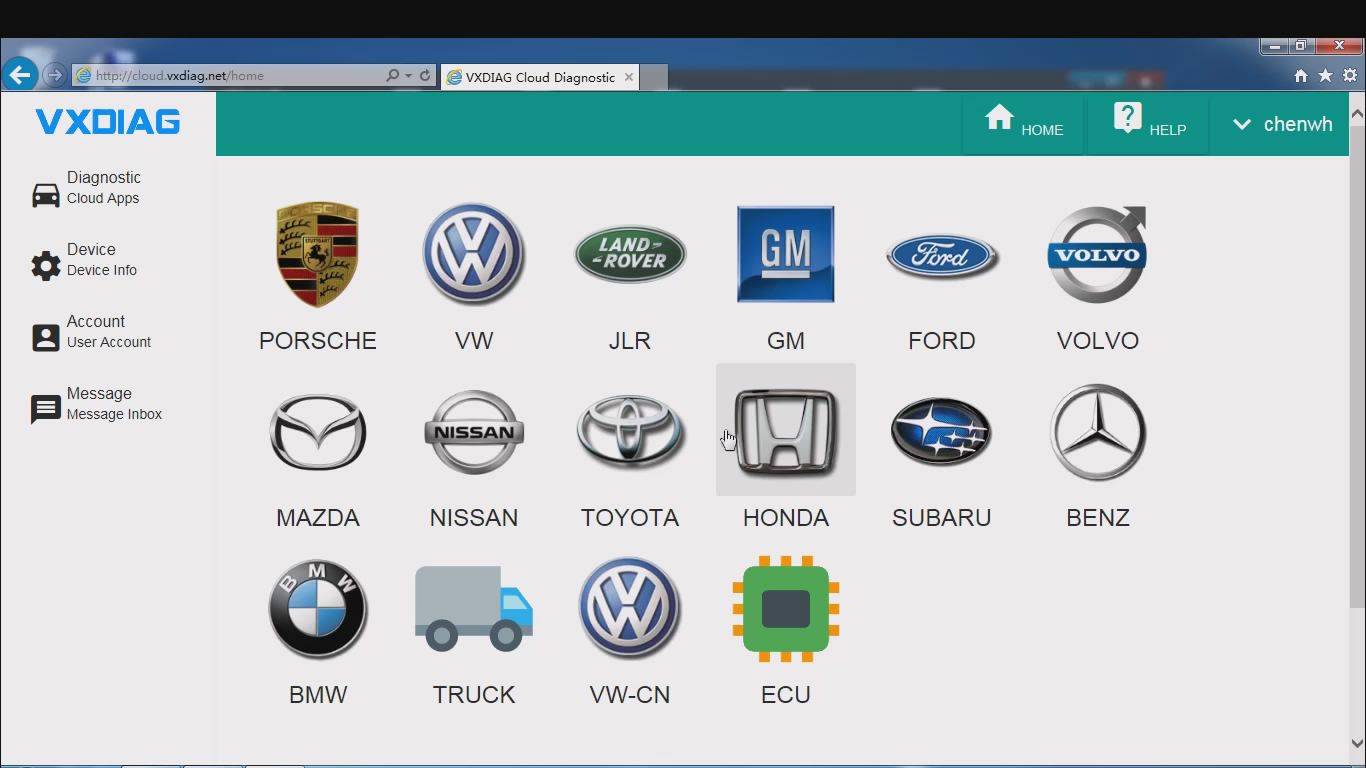
For example, choose “Mazda” and click “Open Cloud” (During diagnose process if there is any pop-up connect question please always choose “connect” and “yes”)
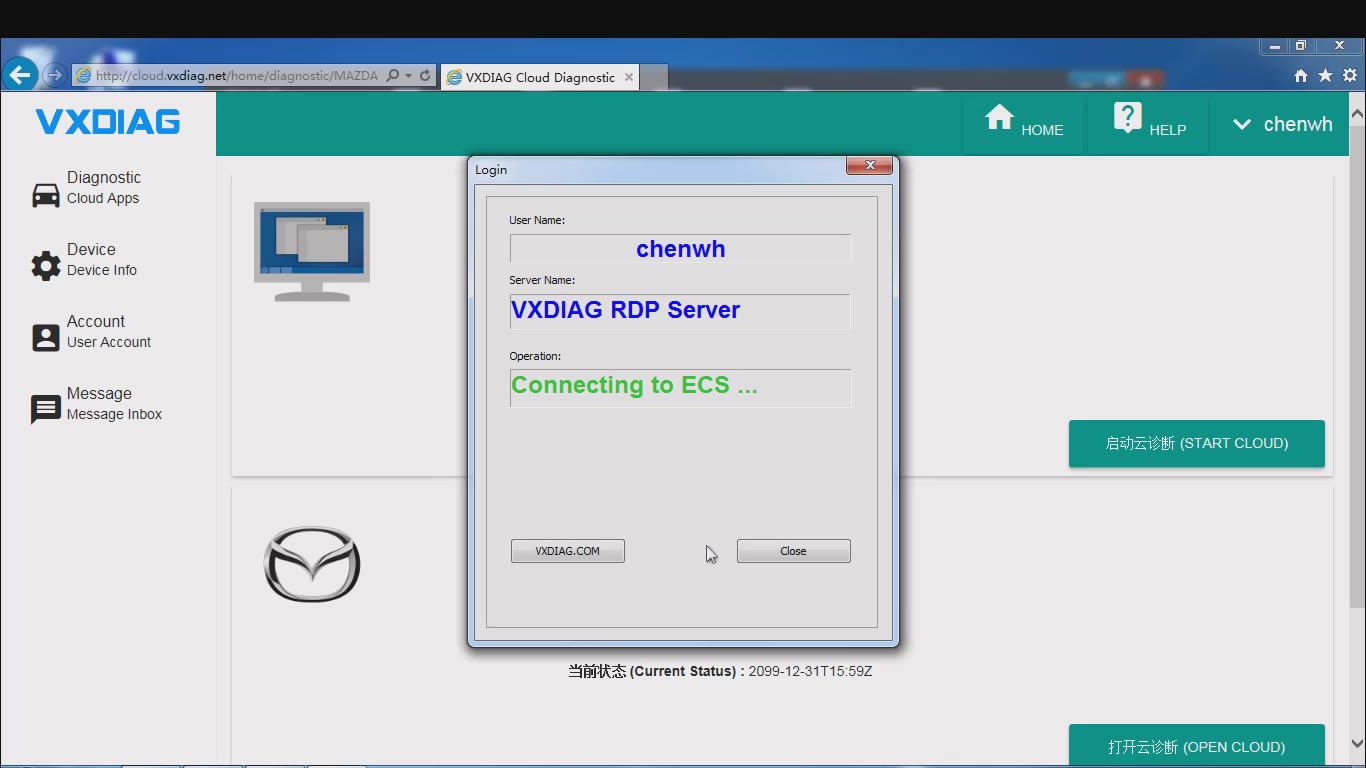
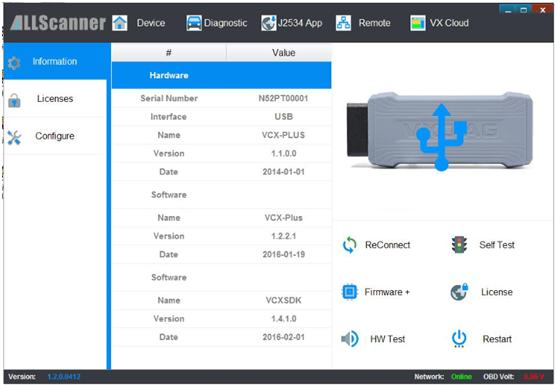
You can see the detailed information of your interface.
Step4. Double click the “Mazda IDS” icon on desktop. Choose “Open a new dialogue program” then it will show “Communicating to PCM”. After that you can start VXDIAG Cloud Diagnostics by VXDIAG VCX NANO or VXDIAG Multi diagnostic tool now!

How to use VXDIAG Cloud Diagnostics? (No need install software)
VXDIAG Cloud Diagnostics is now available to use and tested OK by eobdtool engineers! This blog will show you how to use VXDIAG Cloud Diagnostics. Just use your VXDIAG VCX NANO or VXDIAG Multidiagnostic tool. (No need install any software on PC)
Why to use VXDIAG Cloud Diagnostics?
You don’t have to install any OEM software on PC. You can login cloud diagnostic server and diagnose your car directly online after connecting interface to laptop and car. Isn’t it cool?
What you should know about VXDIAG Cloud Diagnostics?
1. VXDIAG Cloud Diagnostics can work on all VXDIAG VCX NANOinterfaces and VXDIAG Multi diagnostic tools.
2. Free download VX Manager 1.2.0.0905: (Needed for VXDIAG Cloud Diagnostics)
3. VXDIAG Cloud Diagnostics laptop requirements: Win 7, Win 8 or Win 10 OS systems (Win XP is not supported); Explorer 11 or Google chrome (For login cloud diagnostic server http://cloud.vxdiag.net)
How to use VXDIAG Cloud Diagnostics?
Part1. Set up VX Manager Driver
Part2. Login VXDIAG cloud diagnostic server and start diagnosis.
Step1. After installed VX Manager, double click the icon. It will pop up an interface, choose “I accept the agreement”, click “Next”, then “Next”. Wait for a minute it will show “VCX SDK Driver Install”, after that click “Finish”.
Step2. Double click the “VCX Manager” shortcut, click “Cloud Diagnostics”
Then it will pop up a website for login. Input name and password (You can ask the sales),
Step3. After login, you can choose whichever car brand to start cloud diagnosis.
For example, choose “Mazda” and click “Open Cloud” (During diagnose process if there is any pop-up connect question please always choose “connect” and “yes”)
You can see the detailed information of your interface.
Step4. Double click the “Mazda IDS” icon on desktop. Choose “Open a new dialogue program” then it will show “Communicating to PCM”. After that you can start VXDIAG Cloud Diagnostics by VXDIAG VCX NANO or VXDIAG Multi diagnostic tool now!
How OBDSTAR X300M change Mazda 6 2006 mileage?
OBDSTAR X300M is a professional and universal mileage tool for all cars via OBD. This is guide for using OBDSTAR X300M to change Mazda 6 2006 mileage, very easy steps for you!
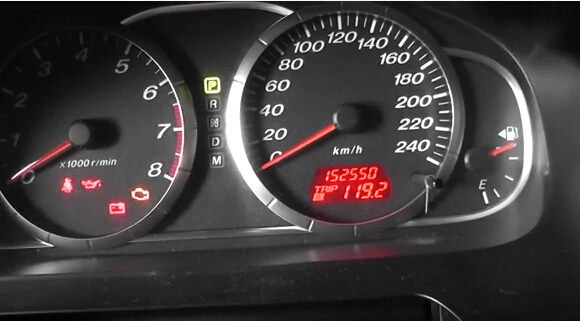
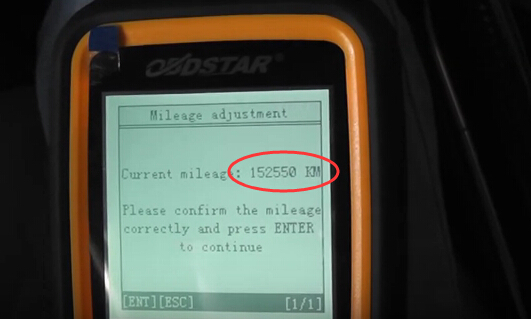
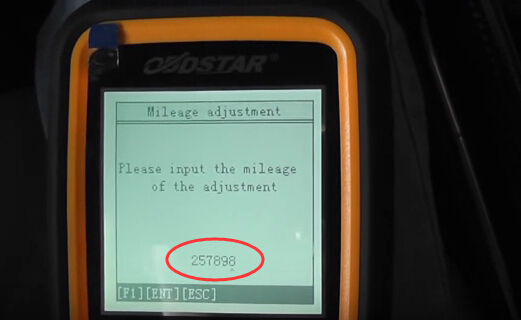
This is the original mileage of Mazda 6 2006: 152550km
Follow these steps to correct the mileage quickly:
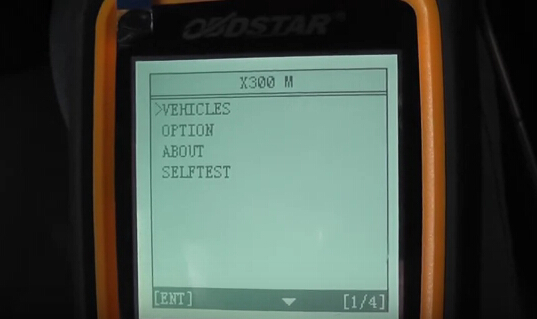
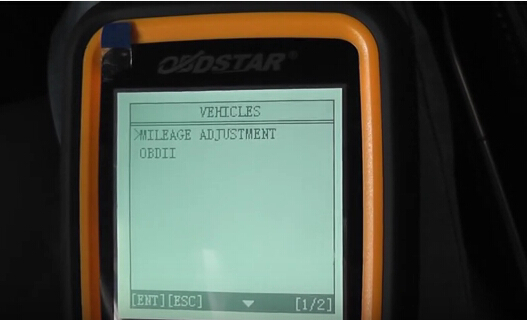
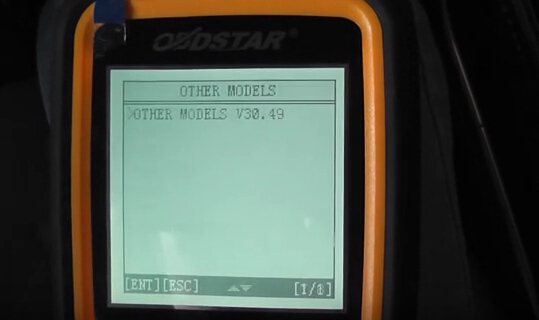
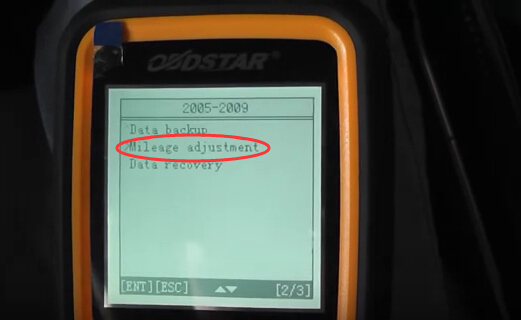
Step1. Start OBDSTAR X300M Mileage Correction Tool, choose “Vehicles”→ “Mileage Adjustment”→ “Other Models”
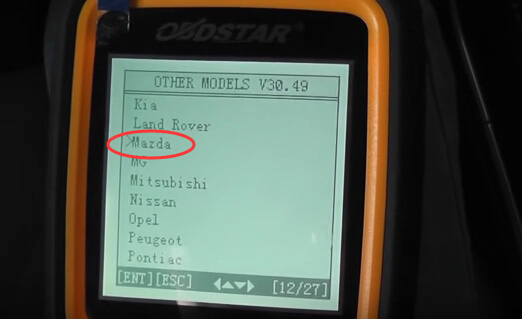
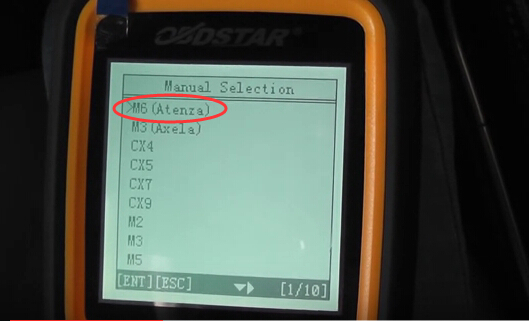
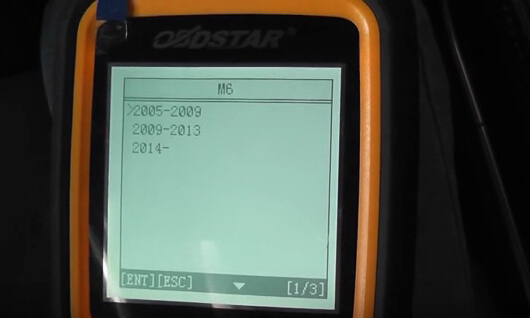
Step2. Choose “Mazda”→ “M6”→ “2005-2009”
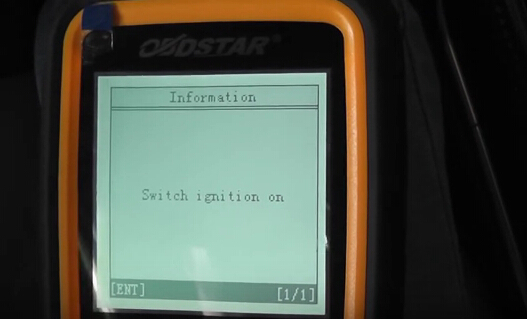
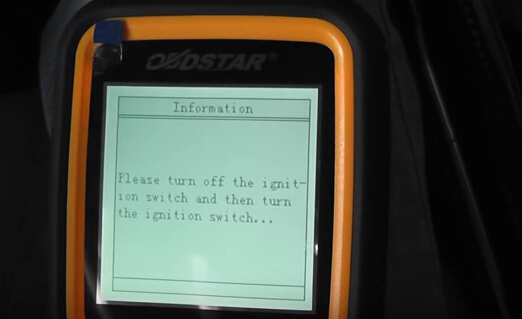
Step3. Now switch ignition on, OBDSTAR X300M will remind you to do data backup before changing mileage. (Data backup is next step) Then turn off the ignition and turn it on again.
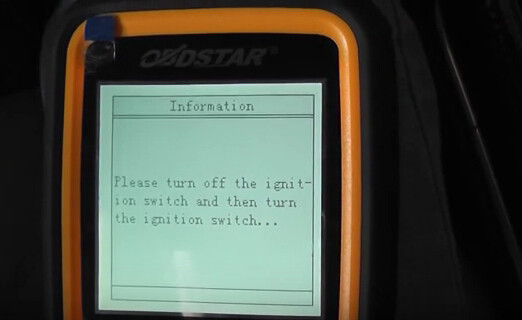
Step4. Data Backup: Turn off the ignition and turn it on again. Wait a moment then input the name of file to save and data backup success.
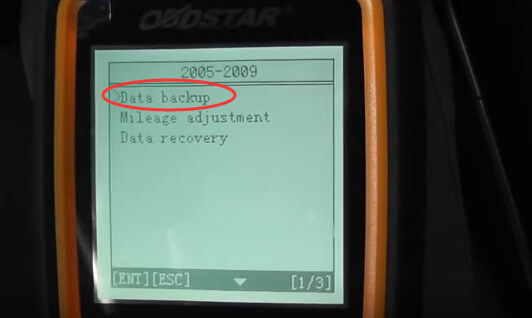

Step5. Mileage Adjustment: Turn off the ignition and turn it on again. Also wait a moment for OBDSTAR X300M to read mileage, after that confirm the original mileage.
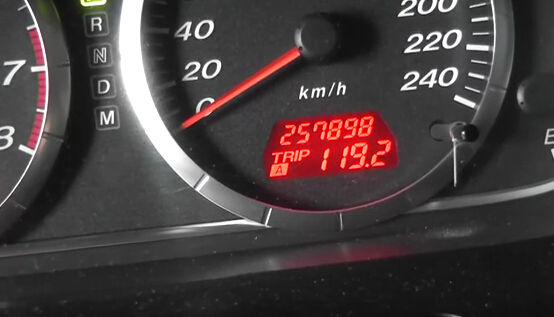
Step6. Last step!! Input the mileage you want to change to and confirm it. Turn off the ignition and turn it on again, then wait a second for mileage adjusting to complete. Now the Mazda 6 mileage is changed successfully by using OBDSTAR X300M odometer adjustment tool.
OBDSTAR EEPROM PIC adapter tested ok with X100 pro and X300 pro
New update news:
OBDSTAR EEPROM adapter is newly added with PIC adapters & cables and verified working fine with OBDstar X100 pro/ X-300PRO to read write CPU data on a part of car computer. And now it is called OBDSTAR EEPROM PIC 2-in-1 adapter. As known, the EEPROM is used to read out password from EEPROM chip and restore data.
PIC adapter workable car models (05-26-2016 update):
Initialize CPU data for immobilizer coil on FAW Wei Chi V5(PIC)
Initialize CPU data for immobilizer coil on FAW N5 (FREESCALE)
Initialize CPU data for immobilizer coil on FAW N7 (FREESCALE)
More car models are under development.
Why immobilizer coil needs to be initialized?
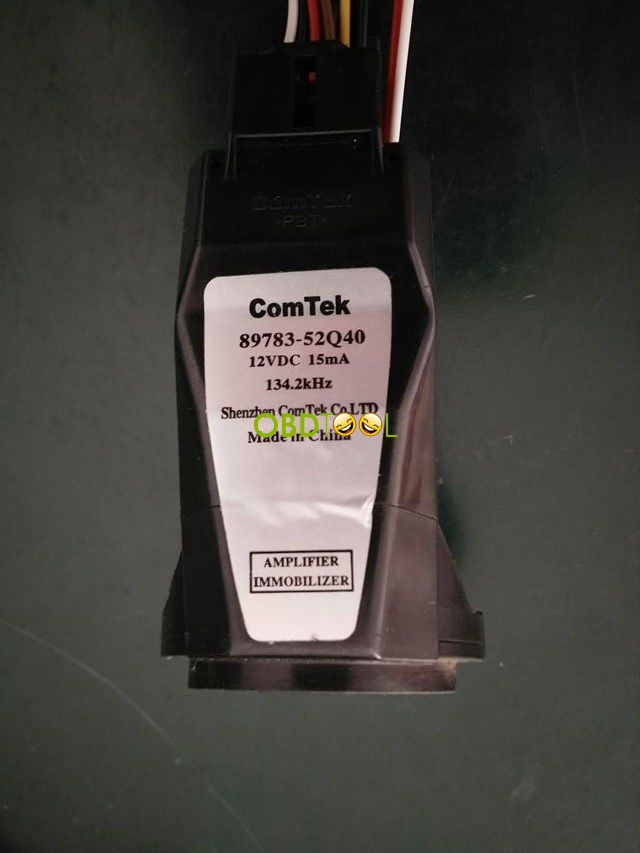
Take FAW Wei Chi V5 (Immobilizer coil model is 89783-52Q40) and FAW N5/N7 (Immobilizer coil model is 89783-TBA00) for example, if their keys are lost, the 4S tend to replace new immobilizer coil then match key, usually a immobilizer coil cost about $50-$85. However, our OBDSTAR PIC adapter is designed to initialize adapter without replacing immobilizer coil, you just directly match new key after immo coil initialization. Besides, PIC adapter is able to initialize immo coil for unlimited times, which will help car owner save the new immobilizer coil cost and also time cost.
EEPROM adapter workable car models and corresponding function:
Can read/write/save/restore data for following group of chips:
24C01/02/04/08/16/32,
93C46/56/66/76/86
25010/020/040/080/160/320/640/128/256
95010/020/040/080/160/320/640/128/256
Can read out IMMO code for following car models:
Beiqi E150, E130
Buick Sail, Hideo new GL8, LaCrosse after 09, Regal after 09 and Ang Kela
Cadillac SLS and SRX
Changan CM8, Yue Xiang, Zhi Xiang and Benben
Changhe
Chery SIIC Transportation and DIAS
Chevrolet Cruze and TRAX
Chrysler
Citroen Elysee
Dflz DIAS
Dfpv S3
Geely Dorsett /Vision
Great Wall Wingle (diesel)
Hafei
FAW Haima Automobile 323 and DIAS
Hawtai DIAS
Huapu
MG MG3
Jiangling Landwind
Liebao
Skoda
Volkswagen
ZNA
Zotye
Note: Need to remove EEPROM chip to read out code.
How PIC adapter work with OBDstar X-300PRO and initialize immo coil on FAW Wei Chi V5?
FAW Wei Chi V5 key lost and firstly need to initialize immo coil, the procedure shown as follows:
1.Remove immobilizer coil from ignition switch, model: 89783-52Q40
2.Take apart immobilizer coil and then connect to the PIC adapter, there are two optional methods:
(1). Directly to connect
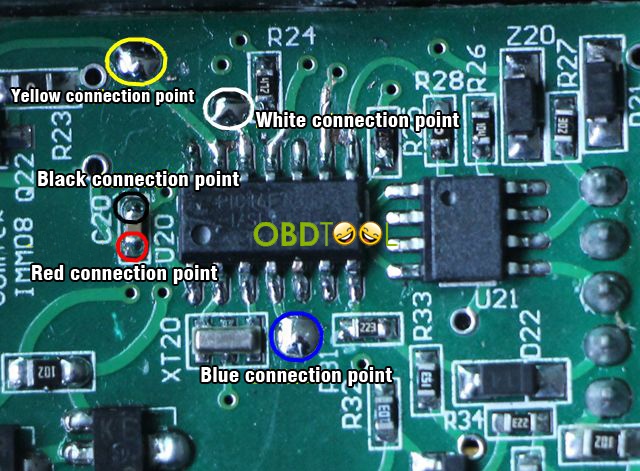
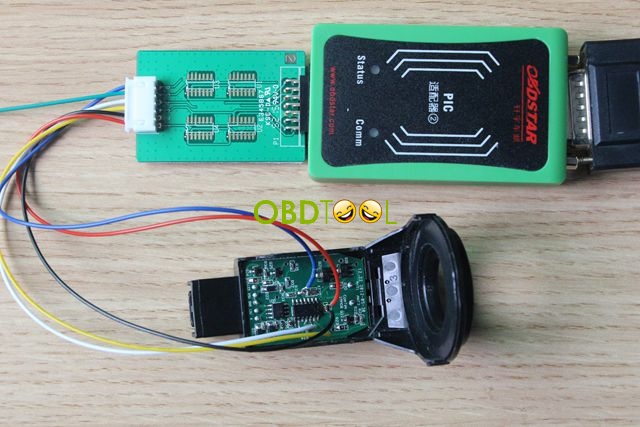
(2) Take apart the chip to weld:
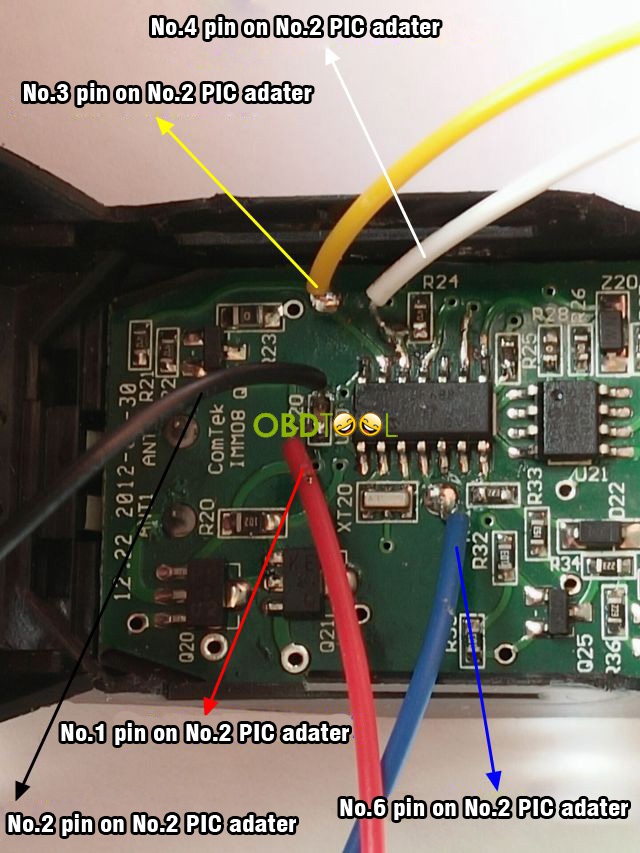
Take apart the 14pin chip from immobilizer coil, then weld to the NO.2 PIC adapter. (Any one of following 4 welding position is ok).

3.Connect well X-300 Pro main unit, adapter and No.2 PIC adapter, and then supply power. Press menu to enter: Function – EEPROM adapter- PIC/ Freescale – FAW- Wei Chi V5.
4.Initialization, wait until it finish.
5.After initialization, install immo coil back to the car, start to match key, procedure as follows:
Match 2 keys:
1.Insert a new key into ignition lock, wait 5 seconds (Note: just insert key to OFF position, not turn to ON position)
2.Insert the second new key into ignition lock, wait 5 seconds (Note: just insert key to OFF position, not turn to ON position)
3.Take out the second key from ignition lock, then insert one key that programmed into the ignition, quick turn on and off ignition for 5 times, immo light turn off, program done.
4.After key programming done, it needs to synchronize engine and immobilizer. Procedure as follows: connect X300 PRO to the vehicle, enter X300 pro IMMO remote match – FAW Wei Chi V5 – Engine and immobilizer synchronization – type.
5.Synchronization complete.
Done.